


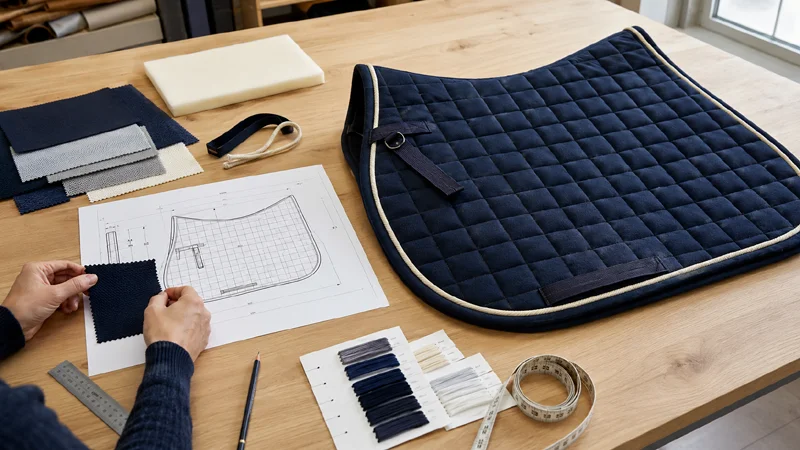
Um guia técnico sobre almofadas de sela não precisa de ser complicado. O que é preciso é que elimine as suposições.
O seu fabricante não deve ter de adivinhar a forma da almofada, as medidas finais, os materiais, o acolchoado, as cores ou a posição do logótipo. Se estes detalhes não estiverem indicados, duas pessoas podem olhar para o mesmo desenho e interpretá-lo de forma diferente.
Um dossier técnico útil sobre almofadas de sela deve abranger a utilização prevista do produto, a forma, as medidas, os materiais, a construção, a marca e a aprovação de amostras. Aqui estão as 12 especificações a incluir.
1. Definir o tipo de almofada de sela e a utilização pretendida
Comece por indicar se está a desenvolver uma almofada de sela para dressage, saltos ou GP. Em seguida, explique se se destina à equitação do dia-a-dia, ao treino, à competição ou a uma coleção de produtos coordenados.
Evite descrições vagas, como “uma almofada de sela de alta qualidade para todos os cavaleiros”. Uma descrição mais clara seria: “Almofada de sela GP concebida para a equitação diária, com um acabamento acolchoado simples e uma marca discreta.”
De um esboço feito à mão a uma amostra aprovada
Num projeto de almofada de sela em que os dados foram anonimizados, o comprador forneceu inicialmente apenas um esboço desenhado à mão, sem medidas, especificações de materiais nem detalhes de fabrico.
A Zest esclareceu, em primeiro lugar, que a almofada de selim se destinava à equitação do dia-a-dia e não à competição ou a outra utilização especializada. Em seguida, utilizámos o formato de uma almofada de selim já existente como ponto de partida para o desenvolvimento, adaptámos o design e produzimos uma amostra para avaliação. O comprador aprovou a amostra e avançou com a encomenda.
Este exemplo não significa que um esboço seja suficiente para a produção. Mostra, sim, por que razão a finalidade de utilização deve ser confirmada antes de se avançar com os detalhes técnicos.
2. Adicione uma figura clara e um desenho técnico
Forneça desenhos em planta da parte da frente e de trás. Identifique a forma exterior, a linha da lombada, a zona da cernelha, a direção do acolchoado, a bainha, o debrum, as alças e a posição do logótipo.
As fotografias de referência podem ajudar, mas indique o que cada fotografia se destina a mostrar. Por exemplo: “A referência A serve apenas para a forma da borda frontal. Não copie o acolchoado, a bainha nem a posição do logótipo.”
3. Definir dimensões e pontos de medição
Não utilize «Pony», «Cob» ou «Full» como especificação completa do tamanho. Indique também as medidas finais em centímetros.
Crie um diagrama de medição e atribua a cada local um número ou uma letra. Este local é designado por «ponto de medição» (POM). Para cada POM, registe separadamente o valor-alvo da medição e a tolerância permitida.
| POM | Medição | Objetivo | Tolerância |
|---|---|---|---|
| A | Comprimento da coluna vertebral | Marca a especificar | Marca a especificar |
| B | Queda frontal | Marca a especificar | Marca a especificar |
| C | Queda traseira | Marca a especificar | Marca a especificar |
| D | Posição mais baixa da correia de circunferência | Marca a especificar | Marca a especificar |
| E | Posição do anel em D ou da correia de sela | Marca a especificar | Marca a especificar |
Explique também como é feita cada medição: em plano ou ao longo de uma curva, de borda a borda ou de linha de costura a linha de costura, e antes ou depois da encadernação.
4. Especificar o tecido exterior
Registe a composição das fibras, a estrutura do tecido, o peso, quando relevante, o aspeto da superfície, a cor e qualquer acabamento necessário.
Se o material exato ainda não tiver sido selecionado, descreva o aspeto pretendido e a utilização a que se destina e, em seguida, peça ao fabricante que apresente opções concretas. Não se baseie em expressões como “tecido de luxo” ou “poliéster de alto desempenho”.
5. Especificar o preenchimento
“Estofamento médio” não constitui uma especificação de produção. Indique o material de estofamento, a espessura ou o peso, o número de camadas, a posição e a referência do material aprovado.
O acolchoado pode afetar a espessura final. Se a espessura for importante, explique onde e como deve ser medida.
6. Trate o forro como um material distinto
Indique o forro interior separadamente do tecido exterior e do enchimento. Especifique a sua composição em fibras, a sua construção, a textura da superfície, a cor e a referência aprovada.
Descrições como “respirável” ou “que afasta a humidade” não são suficientes por si só. Se um requisito de desempenho for relevante, defina como será verificado.
7. Controlar o padrão de acolchoado
Indique o padrão de acolchoado, o tamanho da unidade, a direção, o espaçamento, a cor do ponto e o tratamento em torno dos logótipos ou dos elementos adicionais.
“O ”acabamento em losango» pode produzir muitos resultados diferentes. Adicione as dimensões diretamente ao desenho para que o fabricante não tenha de estimar a escala a partir de uma fotografia.
8. Definir «binding» e «piping»
Para cada componente, indique o material, a largura final, a cor, o acabamento da superfície e a posição da junta. Se o projeto tiver duas cores de tubagem, indique qual das cores fica mais próxima do corpo principal.
Utilize um desenho em grande plano para guarnições em camadas, cantos curvos ou detalhes de acabamento invulgares.
9. Posicione as correias de fixação
Defina as tiras do anel em D ou da sela e as tiras ou presilhas inferiores da cinta, de acordo com a construção efetiva do produto. Indique as respetivas posições no desenho de medidas.
Para cada alça, especifique o material, a largura, o comprimento, a cor, o fecho e a costura. Não peça ao fabricante para utilizar uma “posição padrão”.
10. Controlar o logótipo e a identidade visual
Para cada logótipo, defina o método de aplicação, o tamanho final, a posição, a cor, a versão do desenho e se aparece num ou em ambos os lados.
Caso seja utilizado bordado, verifique-o na própria peça acolchoada. Indique também a etiqueta da marca, a etiqueta de tamanho, a etiqueta pendurada, o código de barras e o design da embalagem, sempre que necessário.
11. Definir variações de cor, etiquetas e embalagens
Uma combinação de cores não se limita apenas ao tecido exterior. Registe a cor do forro, da linha de acolchoado, da bainha, do debrum, das alças e do logótipo para cada versão.
| Componente | Variante de cor 1 | Variante de cor 2 |
|---|---|---|
| Tecido exterior | Marca a especificar | Marca a especificar |
| Forro | Marca a especificar | Marca a especificar |
| Linha para acolchoar | Marca a especificar | Marca a especificar |
| Acabamentos e debrum | Marca a especificar | Marca a especificar |
| Correias de fixação | Marca a especificar | Marca a especificar |
| Logótipo | Marca a especificar | Marca a especificar |
Os requisitos de rotulagem dependem da classificação do produto e do mercado de destino. O Anexo V do Regulamento (UE) n.º 1007/2011 inclui os “artigos de fantasia e de selaria, de matérias têxteis” entre os produtos para os quais a rotulagem da composição em fibras não é obrigatória. As marcas devem, ainda assim, confirmar a classificação dos seus produtos e verificar se se aplicam outros requisitos nacionais ou comerciais antes de aprovarem as etiquetas. Ver Regulamento (UE) n.º 1007/2011.
Mesmo nos casos em que a indicação da composição das fibras não é obrigatória, registar cada material no dossier técnico continua a ser útil para o aprovisionamento e o controlo da produção. As instruções de cuidados devem basear-se nos materiais e na construção do produto acabado. ISO 3758:2023 descreve um sistema de símbolos de instruções de lavagem para artigos têxteis.
12. Registar a aprovação das amostras e as alterações de versão
A primeira amostra faz parte do processo de desenvolvimento. Não deve, por si só, servir de instrução para a produção.
- Registe todas as alterações solicitadas.
- Atualize os desenhos e a tabela de medidas.
- Atualizar a lista de materiais.
- Substituir os elementos gráficos obsoletos.
- Adicione um novo número de versão e uma nova data.
- Indique qual a amostra e a versão do documento que foram aprovadas.
- Confirme se o fornecedor está a utilizar a mesma versão.
Se a marca exigir ensaios de solidez da cor ou de estabilidade à lavagem, o dossier técnico deve identificar o procedimento de ensaio e o nível de aceitação. Um requisito relativo à variação dimensional deve especificar o procedimento de lavagem, o método de medição e a variação permitida. Não basta referir uma norma sem definir o resultado exigido.
Para obter apoio ao desenvolvimento relacionado, consulte o Zest's fabrico de almofadas de sela personalizadas, Serviços OEM e ODM e desenvolvimento de amostras páginas.
Lista de verificação do pacote técnico do tapete de sela
- Tipo de produto e utilização prevista
- Desenhos técnicos da frente e de trás
- Nomes dos tamanhos e medidas finais
- Pontos de medição definidos
- Valores-alvo e tolerâncias
- Especificações separadas para o tecido exterior, o enchimento e o forro
- Padrão e dimensões do quilt
- Detalhes de acabamentos e de debrum
- Especificações da correia de fixação
- Método, tamanho e posição do logótipo
- Tabela completa de combinações de cores
- Etiquetas, cartelas e embalagens
- Exemplos de comentários e número da versão atual
Se já tiver um pacote técnico para almofadas de sela, carregue-o para uma análise de viabilidade de fabrico. Inclua os desenhos, as medidas, as referências aos materiais e o mercado-alvo.
Perguntas frequentes
Um fabricante consegue desenvolver uma almofada de sela a partir de um esboço feito à mão?
Um esboço pode ser um ponto de partida, mas a finalidade, a forma, as dimensões, os materiais, a construção e a identidade de marca ainda têm de ser esclarecidos. O projeto deve, em seguida, ser submetido a amostragem e aprovado.
Preciso de conhecer todos os materiais antes de contactar um fabricante?
Não. Descreva o aspeto, a posição e a utilização pretendidos e, em seguida, solicite opções de materiais. Registe a referência aprovada no dossier técnico.
Basta uma amostra de referência?
N.º. Indique quais as características que devem ser respeitadas e, em seguida, registe as decisões finais nos seus próprios desenhos, na lista de materiais e na tabela de medidas.
O dossier técnico deve incluir tolerâncias?
Sim, nos casos em que o controlo das medições é importante. Registe separadamente o valor-alvo e o desvio permitido.
Quando é que o dossier técnico deve ser atualizado?
Atualize-o sempre que houver alterações num desenho, tamanho, material, cor, construção, ilustração, etiqueta ou detalhe da embalagem que tenha sido aprovado.
Pontos-chave
- Comece por definir a finalidade de utilização.
- Não utilize um esboço, uma fotografia ou a indicação da medida como especificação completa.
- Defina separadamente o tecido exterior, o enchimento e o forro.
- Dê um toque especial aos acolchoados, acabamentos, alças e logótipos.
- Atualizar o dossier técnico após a análise da amostra.
- Mantenha a amostra aprovada e a especificação escrita em conformidade.
Se tiver apenas um esboço ou um briefing inicial do produto, Envie as especificações do seu produto para análise. O Zest permite identificar o que ainda precisa de ser confirmado antes da amostragem.
Autor e editor: Jessica Liu
Última revisão: 1 de setembro de 2026