


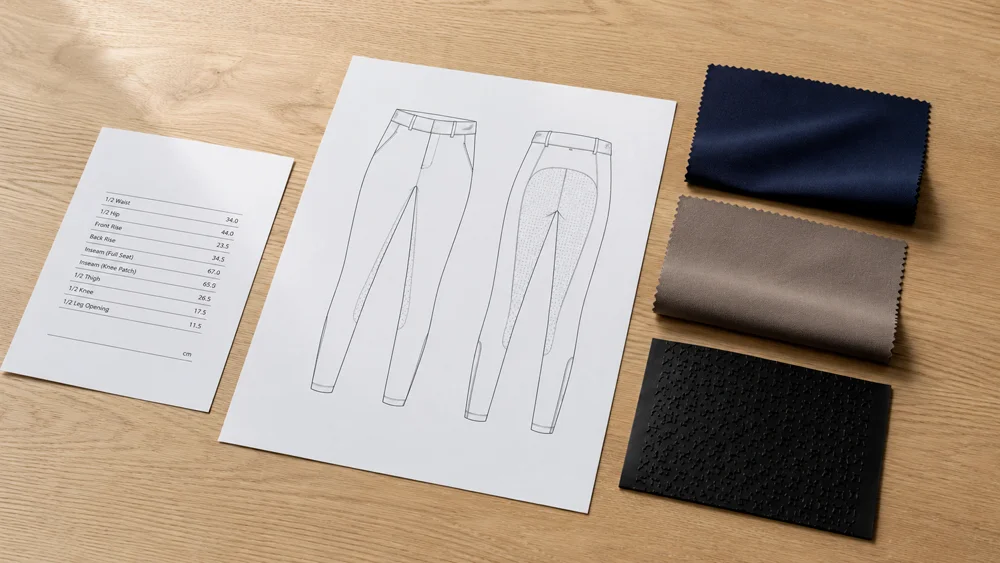
A riding-breeches tech pack should give your factory enough information to make the right first sample.
It does not need to settle every detail for bulk production. But it should clearly show the design, materials, base-size measurements, construction, grip and branding.
Anything that is still open should be marked as open. If the factory has to guess, the tech pack is not ready.
What does your factory need before sampling?
Check these six areas first:
- The correct style and document version
- Clear technical drawings
- A fabric and trim list
- Base-size measurements
- Grip and logo details
- A list of open questions
If one of these areas is unclear, resolve it before the factory cuts the sample.
1. Start with the correct style and version
A factory may receive several drawings, measurement sheets and artwork files for the same style. Make it obvious which files are current.
Put this information at the beginning of the tech pack:
- style number and product name;
- version number and issue date;
- base sample size;
- intended size range;
- purpose of the sample;
- person responsible for approval.
Also explain what the first sample is meant to check. Is it for fit, construction, colour, grip placement or all four?
A fit sample does not automatically approve every detail for bulk production. State what is being approved at each stage.
2. Show how the breeches should be made
A fashion sketch shows the overall look. It rarely gives a factory enough information to make the garment.
Include clear front and back technical drawings. Add side or close-up views where needed.
For riding breeches, show:
- waistband shape and height;
- gusset shape;
- inside- and outside-leg seams;
- pocket type and opening;
- lower-leg panels or cuffs;
- zip and belt-loop positions;
- full-seat or knee-patch grip area;
- logo and label positions.
Do not write “logo here” or “grip as shown”. Use a clear reference point and measurement.
For an asymmetric detail, say whether it is on the wearer’s left or right side.
You can see Zest's current riding apparel manufacturing scope on its product page.
3. List every fabric and trim
Do not group every material under one broad description.
Your bill of materials, or BOM, may include:
- main body fabric;
- lower-leg or contrast fabric;
- pocket lining;
- waistband support;
- thread, zips and fasteners;
- labels;
- silicone grip and logos;
- packaging.
Give each item its own reference, colour and location. If the final material has not been chosen, list the options and say when the decision must be made.
Go beyond “four-way stretch”
Words such as “stretchy”, “breathable”, “anti-pilling” and “durable” are too broad on their own.
If a performance point matters, agree on how it will be checked and what result is acceptable.
| Performance point | Example source for a test method |
|---|---|
| Stretch and recovery | ISO 20932-1:2018 |
| Pilling | ISO 12945-2:2020 |
| Abrasion | ISO 12947-2:2016 |
| Colour transfer from rubbing | ISO 105-X12:2016 |
These standards do not set one universal target for riding breeches. The correct method and pass level depend on the fabric and product.
4. Define the base-size measurements
A measurement name is not enough. Explain exactly where and how to measure.
For each point of measurement, or POM, include:
- the POM name;
- a diagram or clear location;
- the measuring method;
- the target measurement;
- the unit;
- the allowed tolerance.
Keep the target and tolerance in separate columns. For example, the target tells the factory what to make. The tolerance tells the factory how much variation is allowed.
Depending on the design, important breeches measurements may include the waistband, hip, front and back rise, thigh, knee, calf, inseam, leg opening, gusset and pocket position.
Do you need every size before the first sample?
Not always.
You can develop the base-size fit first. But the tech pack should still record the planned size range, who will create the grading and when it will be approved.
One approved base-size sample does not prove that every graded size will fit correctly.
5. Explain the important construction details
Small details can change the fit and appearance of riding breeches. Give each one a clear instruction.
- Waistband: Show the finished height, shape, closure and internal support.
- Gusset: Show its shape and where it joins the leg panels.
- Pockets: State the type, opening direction, position and usable size.
- Lower leg: Define the panel, cuff or finish and its fabric.
- Seams: Mark where a specific seam or stitch is required.
A note such as “use flatlock” is not enough if it does not show which seams should use it.
6. Treat every silicone application separately
Silicone can be used for grip, branding or decoration. These are not the same specification.
For each application, state:
- its purpose and process;
- its position;
- the artwork version;
- finished size;
- colour;
- orientation;
- coverage area;
- any required artwork or placement approval.
Do not use “full-seat grip” as the only instruction. Draw the real boundary so the factory can see where the grip starts and stops.
A real, anonymised example
In an anonymised riding-breeches specification reviewed for this article, the product sheet separately defined the main and lower-leg fabrics, flatlock construction, stitch density, waistband height, gusset, pockets and lower-leg panels.
It also listed four silicone applications. Their process, position, colour or size was recorded separately. One grip area had a stated thickness of 0.5–0.8 mm, and the artwork had to be confirmed before printing.
This was one project, not a universal standard. The same thickness or construction should not be copied into another product without checking the fabric and design.
7. Keep open questions in one place
Some decisions may still be open when the first sample starts. That is manageable if everyone can see them.
| Open item | Current choice | Who decides? | Needed before |
|---|---|---|---|
| Main fabric | Option A or B | Brand product developer | Cutting |
| Grip artwork | Version 2 | Brand designer | Printing |
| Logo colour | Tonal or contrast | Brand designer | Strike-off |
| Full grading | After base-fit approval | Pattern team | Size-set sample |
This is easier to control than spreading decisions across emails, chat messages and marked-up photographs.
8. Check labels before you approve them
Tell the factory where you plan to sell the product.
For the UK market, textile labels must show the required fibre-content information. If different parts use different fibre compositions, check whether each part needs to be identified. See the UK Government textile-labelling guidance.
For EU sales, check the approved fibre names and composition wording in Regulation (EU) No 1007/2011.
If you use care symbols, identify the system being followed. ISO 3758:2023 covers symbols for washing, bleaching, drying, ironing and professional textile care.
Do not choose care instructions from the fibre name alone. The finished breeches may combine fabric, elastic, silicone, transfers and other components with different care limits.
This is general product-development guidance, not legal advice. Check the rules for every market where the product will be sold.
Quick pre-sampling checklist
- Is the correct style and version easy to identify?
- Do the drawings show the front, back and important details?
- Are the waistband, gusset, pockets, seams and lower leg clear?
- Does every fabric and trim have its own reference?
- Are the base-size POMs and tolerances defined?
- Does each grip or logo have a size and measurable position?
- Are open decisions listed with an owner and deadline?
- Does the document explain what the first sample must prove?
If any answer is “no”, fix that point before sampling.
What if you do not have a complete tech pack?
You can still start a development discussion. First, organise the information you already have:
- clear reference images;
- details you want to keep or change;
- a reference garment or base measurements, if available;
- your intended fit;
- fabric preferences;
- grip and logo requirements;
- target sales markets;
- questions that are still open.
A reference garment can help explain fit or construction. Record which features are references, which should change and which should be left out.
The next step is to put the agreed information into one controlled document. Do not leave the final instructions scattered across messages.
Learn more about Zest's private-label equestrian clothing development process.
Frequently asked questions
Does a tech pack need every graded size before the first sample?
No. You can start with the base size. But record the intended size range, grading owner and approval stage.
Is a reference garment enough?
Usually not. Explain what you want to keep, what should change and which new details must be added.
What is the difference between a fit sample and an approved sample?
A fit sample is used to check fit and construction. An approved sample has been accepted for a stated purpose. The approval should say exactly what has been accepted.
How should silicone grip placement be shown?
Show the real boundary on a technical drawing or pattern. Add measurements, artwork version, colour and orientation.
Can sampling start while a material is still open?
Sometimes. Mark the substitute clearly and state what the sample cannot prove. Fit and seams may need another review when the correct fabric arrives.
Key takeaways
- Give the factory enough information to make the right first sample.
- Show the construction, not only the overall design.
- List fabrics, trims, grip and logos separately.
- Define every important measurement and how to take it.
- Put open decisions in one clear list.
- Do not treat base-size approval as approval of the full size range.
Author/Editor: Jessica Liu
Creation method: Developed from an anonymised riding-breeches specification, official UK and EU textile-labelling sources, and relevant ISO test-method summaries.
Last editorial review: 25 August 2026
Sources
- UK Government: Textile labelling
- Regulation (EU) No 1007/2011
- ISO 3758:2023 — Care labelling code using symbols
- ISO 20932-1:2018 — Determination of the elasticity of fabrics
- ISO 12945-2:2020 — Modified Martindale pilling method
- ISO 12947-2:2016 — Martindale abrasion resistance
- ISO 105-X12:2016 — Colour fastness to rubbing